Groups
It is only administrators of a company in APEX that can use, create and edit groups.
This is a guide for administrators and companies with an active APEX subscription.
Everyone in your company, case managers, and those with access to a unit who also are added to a group, can see the group that the unit is a part of. A group can be used to set a representant and a document or agreement, that afterwards can be set up in a takeover or inspection for signing. This will then be added to the protocoll.
Contents:
To get to the group function:
- Sign into APEX and press the menu button up to the left.
- Choose the "Admin" option from the list.
- You are then shown the admin menu, and can press the "Groups" option.
How to create a group
- Press the plus-button down to the right
 .
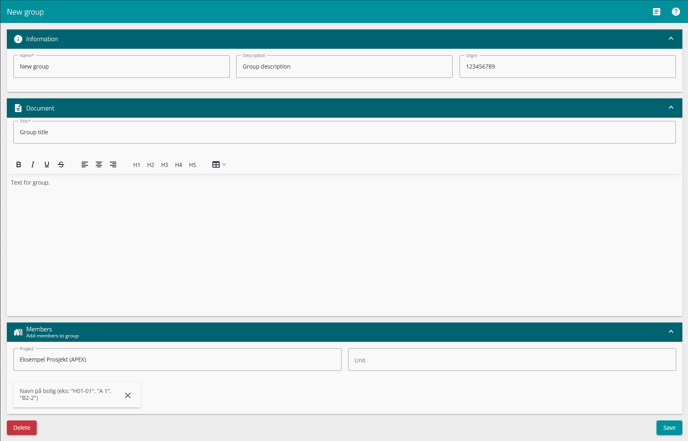
. - You will then be shown a form, where you can fill out information about the group you want to create.
- Fill in the name of the group. What you put here is up to you, but make sure you set a name you will recognize and understand the connection to.
This is an obligatory field, and must be filled to make a group. - Give the group a description. A short description of what the group is made for and to what connection.
- Fill in an organisation number (if accessible, and can be a housing association or other company).
- Give the document a suitable name, indicating what the content will be about.
This is an obligatory field and must be filled in. - Write or copy-paste your desired text into the text-field, that will become the document the group later can read and agree upon.

- Lastly, press the "Save" button down to the left to save your document.
- Fill in the name of the group. What you put here is up to you, but make sure you set a name you will recognize and understand the connection to.
- After setting up the agreement and settings for the group, and saving, you can add members to this group.
Add members to a group
After saving, you will have a new section under the document section. Here you can add members to the group by using the "project" and "unit" search fields. The customers that belong to the units, will then be able to see and sign the document that you made to be the group.
- Search for a project, and thereafter you will get suggestions in "unit" based on the units in the project you chose. Just press on your chosen unit to add it to the group.
- Units added to the group can afterwards be removed by pressing the x-mark beside them.
- You can also delete the entire group, document and all, by pressing the red "Delete" button down to the left.
- Make sure to press the "Save" button to the right when you are finished and happy with the ones you have added, and save your changes.

- After all this you can find the group by navigating back here, for later editing, and in a takeover when you are going through a takeover on a unit added to this group.
- The customer should be added to the unit before you start a takeover, and by doing so get access to the group document.