This is a guide for developers and entrepreneurs administering projects in APEX.
This is done via the project overview:
- Sign in to APEX, and press the menu to the top left.
- Then press the "Projects" option.
- You will be taken to a list of available projects to you, either press your selected one or search for it and then press.
- The list will be empty if you have not created a project yet, or have not been given access to one yet. You can read more about creating a new project here.
Read more about being added as a project manager for access to projects here.
- The list will be empty if you have not created a project yet, or have not been given access to one yet. You can read more about creating a new project here.
- In the project overview you will have a circular button down to the right of the screen, press this to see the projects menu.
- Choose the "View files" option.
Upload a floorplan to a project
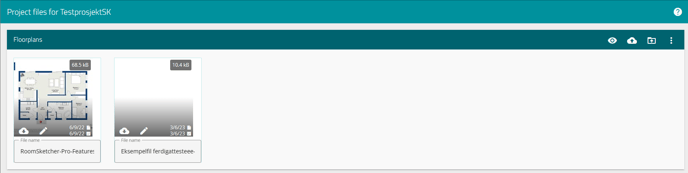
You will have multiple sections for uploading and viewing files in this overview, where "Floorplans" is the one you are looking for. Floorplans can come in different file formats, but APEX makes full use of them in image formats like JPG, PNG or WEBP.
If you try to upload a PDF, then the system will convert each page of the PDF into its own image in the WEBP format. This is because you later can use these images to put markings directly to the floorplan when you create a case.
Uploading can be done in a few ways:
- Drag-and-drop (PC, desktop, Mac)
- Open your file explorer on your unit, and find the file you want to upload.
- Press and hold with the cursor on your file.
- Then drag that file over to the file-section in APEX, and release the button when you have your file over the "Floorplans" section.
- Upload
- This is the icon to the right for the eye, that looks like a cloud with an arrow pointing up. Pressing this will let you upload a file from your unit.
- Press the icon and your file explorer will open up on your unit, then you can navigate to the file you wish to upload.
- Duble click the file, or press the file once and then the "Open" button in your file explorer.
- The file should now be uploaded to the section.

- Insert file from folder
- This is the icon to the right of the before mentioned cloud, looking like a folder with an arrow.
- This icon uses the contents of "Files", the file explorer in APEX, to let you choose from already existing files you have uploaded before. Files can be found in the menu to the top left.
- Navigate the file archive, to the file you have already uploaded into APEX.
- Press the wanted file.
- Press the "Confirm" button down to the right, and your file should be added to the section in the same matter as the others.
No matter what method you used, you will get a confirmation message saying your file was uploaded/added, and you should see an icon in the floorplans section.