This is a guide for estate developers, entrepreneurs and contractors that uses checklists in APEX.
To make a checklist from a template, you first need to make a checklist template. Read more about that here.
Follow these steps to create a checklist from a template:
- Press the menu to the top left, and press the "Checklists" menu option.
- Here you get a few cards, and can press the "Checklists" card.
- You're then shown the list of active and available checklists you have access to, and their progress.
- This list will be empty if none has been created yet.
- To create a new checklist, press the plus-icon
 down to the right.
 - You are then prompted with a window to choose what checklist template you want to use, to set a name for you checklist, and what project to connect it to. Only setting the name is required, the rest is optional.
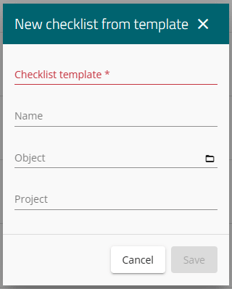
- Choosing a project, will reveal more settings for connecting the checklist to specific elements.
- You can then choose to connect the checklist to a specific unit in that project, and a field that will be working on the checklist.
- The contractor assigned to the specified field, will then be able to work on the checklist and complete the set tasks.
- After you have chosen your settings for the checklist, press "Save" and a checklist with the items and sections from the checklist template will be created.
Use checklist
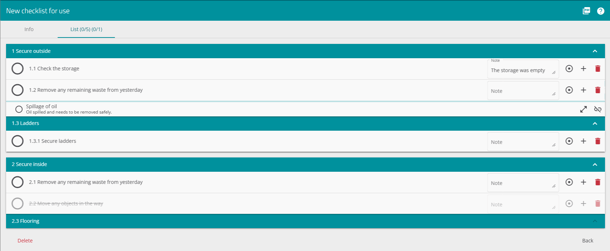
After the checklist is created, you will be sent straight to it. You can also find it by going back to the second step in the description over. You will now see your created checklist with the active points to check and complete.
- To check or mark the point or task as completed, press the circle out to the left of the task text. It will then get a green check-mark.
- If there is something worth noting down in connection to the point, then you have the "Note" field to fill out information.
- If you need to record a deviation from the task, then you can press the little plus-icon to make a new task that is connected to this point.
- If you need a better view of the task, then just press the task-text and you will be shown a full overview of the task.
- If the point or task does not apply anymore, then you can press the circle with a center. This will make the task "not applicable", being irrelevant to the checkslist.

After all the points are either marked or rendered not applicable, then your checklist will be complete, and can be found in the general checklist overview.
A checklist point/task can be deleted with the red trashcan icon to the far right, but for documentation purposes we suggest marking the case "Not applicable" instead.
Edit a created checklist
If the checklist is not added to the correct categories, not with the correct info, or not assigned collaborators, then you can press the "Info" tab to the top left.
- Edit or add your preferred information, and make sure you give the checklist time to update. (It should automatically update and save when you make changes).
- You can connect the checklist to a project.
- You can connect the checklist to a unit.
- You can add or remove a case manager for the checklist.
- Adding collaborators, will let others read and complete the same points and tasks as yourself.
- Write a description for what the checklist will be encompassing.
- Add files and PDF's.
- Then go back to the "List" tab, or use the "Back" button to leave the checklist.
- Delete your checklist by pressing the "Delete" button, down to the left.
