This is a guide for users of APEX.
Uploading images in APEX makes it easy to keep track of and show what you are specifically aiming for. This can be made even easier by highlighting exactly what you want, or resizing your image.
Editing of images can be found like this:
- Upload a file to a file section
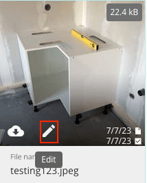
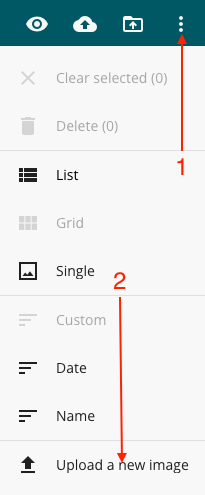
Can also retrieve a file that already exists in APEX. - Select the desired file, press the file menu at the top right and select "Edit", or click the pencil icon you find in connection with the file.
Alternative to 2.: Click the file menu and select the option "Upload a new image",
to select and open the desired image directly in the editing tool.
When you're finished, the edited image will be uploaded.
Editing
The editing tool supports a few features:
- Crop your image, or make a section.
Here you can create a desired section that removes redundant elements in your image. - Add characters and shapes.
Draw an arrow that points directly to what you want to highlight, draw a circle around the object that is the subject or draw a square around a specific element. - Add text.
If you need to write text directly on images, you can create a text box. A nice tool if you need to enter measurements or additional information. - Drag in other image elements.
If you have an image that you would like to have above the image you are editing, you can simply drag an image from your file archive directly over the image that you are already editing. - Image scaling.
Is the image large? Rescale the image to a smaller resolution so that it is easier to process. If the image is small, it can also be scaled up. Enter the desired size of the image yourself. (Example: 1920 x 1080) - Censorship.
If you need to apply a censoring filter to any element in your image, you can use this tool to keep the outline but mask the elements that are allowed to appear.
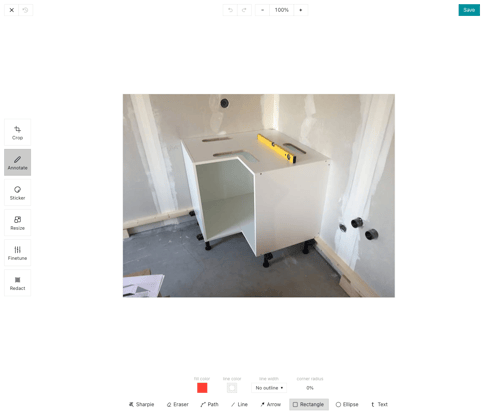
When you have finished editing your photo, press "Save" at the top right.
- When you upload an image, an original is saved, so that the image you process/edit does not replace the original image.
The original can still be found in "Files", while the edited file will remain where it was uploaded.