Files
Files in APEX is a file-explorer where you can save and organize your, your company's and your project's files.
This is a guide for estate developers, entrepreneurs and contractors using APEX.
You can organize and administer your files under "Files" in the menu. Your files are accessible through other sections where you also upload files. Read more about uploading files here.
Read more about sharing files and folders with others here.
Table of contents
Four types of folders in the explorer
System folders
Created folders
Create a folder
Upload files
Move files
Make a copy
Other tools
Four types of folders in the explorer
- The green folders with stripes on them represent system folders. These are made by the system, containing the company folder, folders for projects, cases, fields and so on. These are not editable or shareable.

- The green folders without stripes represent folders that are created by a user, and can be edited, shared and deleted to your choosing.

- Shared folders and files, found in the "Shared with me" section, will show you every file and folder that has been shared with you.
![]()
- Empty folders are just that, without content. They will appear "less colored" than regular folders, and the point is to show that the folder does not have any other content inside. (Empty folders in MOM does not show to the customers.)
![]()
![]()
System folders 
These are folders that can not be moved, shared or deleted, and are created by the system itself from certain actions. Cases, addons, personal uploads and the MOM builder are examples of actions that make system folders.
- By going to "Files" from the menu, will show your company name on one system generated folder. Here are all the files that are connected to your company, like projects, cases, addons, and so on, and you can find these folders in the company system folder.
- The shared with me is a system folder, although marked differently. This folder contains all files that has been shared with you.
- The personal folder contains your uploads and is considered "your space" in the Files section of APEX. Here you can create folders and have quick access to files only you need.
System folders can not be shared. If you want to share content in system folders, you will have to download/save them and upload them elsewhere.
Created folders 
If you make a folder in your company folder, this will be available for other users in your entire company. Folders that you create yourself are yours to do with, and can upload files to them as you see fit.
- You can not make your own folder inside the "My uploads" folder. This is strictly made for managing the files you personally upload.
- New folders can not have the same name, and it is the same with files.
Create a folder
- Click or press the plus-icon
 in the down-right corner.
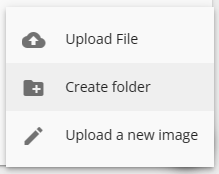
 - Choose the "Create a folder" option from the list.

- The folder is then created inside the folder/area you have navigated to.
- Give the folder a name of your choice.
Notice that folders need to have unique names.
- By clicking and dragging a folder, you can move that folder into other folders. An option is to mark the folder, then click on the three dots op to the right in the functions row and choose "Move".
Folders with no content, and empty of files, will be shown in a weaker color. This is in order to show that there is no need to check if the folder contains files.
Here you can see an example of folders with and without files.
Upload files
- Click the plus-icon down to the right, when you are in the folder you wish to upload a file, and choose "upload file" from the menu. Alternatively you can open you file explorer on your device, then drag-and-drop your file into the folder.
- NOTE! Files can not be over 4 GB large, or else they will be rejected by the system.
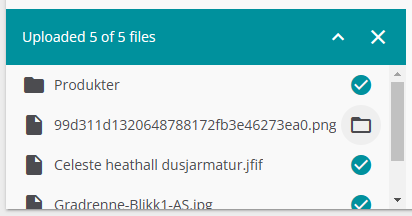
- When starting an upload, you will get a progress window down to the left, showing the file(s) you are uploading, and the progress of the upload.
- You can shrink this window by pressing the little arrow in the top-right.
- You can remove it entirely by pressing the X-button. (This will not cancel the upload, just hide the window.)
- You can cancel the upload(s) before they are done.

- Press the folder-icon to the side of your uploaded file, in order to go to and view that file.
- The window will be grey while "working", and turning green when finished uploading.
- The window for the uploads will be sticking to the bottom left, even if you continue exploring through Files.
Move files
Files can be moved around the folders as you see fit. Moving files/folders can be done by drag-and-dropping into other folders, or by marking the file/folder and press the "Move" button.
- It is possible to drag-and-drop files in the folder-pathing on the top.
- If you have marked multiple files/folders, you will get
- PC/Mac: A single click on files or folders will mark it for further action. Dubble-click a folder or file to navigate into that folder or view that file.
- Mobile: A single press is to open a file or folder, while holding down for a second will let you go into "choosing-mode". Choosing-mode will let you choose multiple folders and files by pressing on them, for further action. To exit choosing-mode, you press anywhere that is not a file or folder.
Make a copy
You can make a copy of a file, and move that to another folder, in order to have the same file in multiple folders.
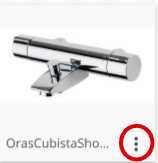
- On the file preview in folders, you have an icon of three dots. This is the icon for more options, press this on your chosen file.

- Press the "Make a copy".
- The new copied file, will then be added besides the original file. Then you can mark the copy and choose the destination folder you want to have it moved.
Other tools
To the top-right in the folder structure, you have a row of other tools.

- Search: Search by words to search through all files and folders you have in your system. Based on the word(s) used in the search, you will get a list of suggested files. Pressing on one suggestion will take you to that file in the system, as long as you have access to that file.
- Listed view/grid view: This button will change based on the active view, and also change the file-view to the chosen type. Listed view will set all files and folders to a horisontal list. Grid view will set folders and other files to a grid.
- Sorting: Sort files/folders by name, last updated or file size. You can change ascended or descended sorting by choosing the same sorting option again. This is set to file/folder name descended by default.